Warung Bebas

Rabu, 27 Agustus 2014

Pretty Bed Sheets-Made by me

Morning!
So I promise I won't keep bombarding you with bedroom posts but I had to share this with you all.
I have been on the hunt for bed sheets for awhile now. Not any 'ol sheets but some that were unique and pretty, but wouldn't break the bank. Kills me that king size sheets are so crazy expensive!
But like most things for my home, I won't let price keep me down! I will find a way to still get what I want for far less.
I did, as usual, look on line and in stores (not many stores, this girl doesn't leave the house much) and I couldn't find anything that fit the bill.
So I made my own.
I started with some clearance sheets, I found for $28 at Homegoods. White of course.
Then added a little pom pom trim ( $6 for all of it) and all of sudden they've gone from plain and boring to super cute and kind of expensive looking!
So cute, right!
I also found these super cute pillow cases at World Market Cost Plus the other night and I love them on the bed. They just add a little fun!

I really love how these turned out and it was so easy!  Now I'm thinking of other ways I can add trim to the rest of our sheets, and the girls. 
I think I feel some ruffles happening over here!

Selasa, 26 Agustus 2014

Naptime Projects-a table transformation

Okay, so feel free to chuckle. I know, I know, what you are going to say......
"YOU JUST PAINTED THAT!" 
Yes, yes I did. But sometimes (okay it happens a lot) the day takes an unexpected turn and the impulsive side of me takes over and I end up transforming a piece that I had no intentions of even spending 10 minutes thinking about that day! Its just how I work. I don't even think about it. It just happens. Yesterday went something like this....I sat down to eat the delicious left overs from dinner the night before. I eat in front of the computer because its the only time I get to read my favorite blogs, do some pinning, you know.  So I'm eating and pinning, when all of a sudden I come across this picture.
{source}
I thought...reminds me of my house. I thought...I really like the way that table looks with its wood top and white base....hmmmmm, kind of looks like my table. And then it happened! 
So long pinning, so long lunch. Honestly, I was done already, it was fish Brian had made the night before, oh my gosh, so good! Okay, back to the table. 
"Hey Brian, do you like this table painted blue?" 
"No, I hate it." (I didn't know he felt so strongly about this)
"Okay, can you help me carry it to the garage?" 
"Yup."
That's how I spent the rest of nap time. Stripping paint and sanding. Sanding till I thought my hand was going to fall off! But somehow it all seemed kind of therapeutic and right. I mean sometimes when you know, you just know. Thats how I make a lot of interior decisions. Sometimes they are spot on and I love it for years. Sometimes its a hot mess and I know right away, but I try to live with it. Then there are the times when I think I love it and my husband say's he hates it and this amazing thing happens. "I hate that" is good motivation for me. 
Later last night, he finished the sanding and then he waxed it. 
People, we are loving this wax! 
 Its not exactly like the one above. Because after all this sanding as of late, I wonder if I will ever paint a piece of furniture again. I mean seriously! Brian just laughs when he hears this. He knows me a little too well. 
I KNOW this is a forever change and I love, love, love, her!!
So now let me tell you a little story about this table that I didn't share before.
If you read this post then you know that I found it on Craigslist for $40. Awesome, right?!
Well thats not the entire story.
The first time I saw it listed, I passed by it. I don't know why? I just did. I guess it didn't speak to me right away.
But then I realized it would actually work quite well in the space so I made arrangements to buy it. When I went to pick it up, I met the husband and wife selling it. They told me that they had been married for 45 years and this table had been a wedding present.
 The husband wasn't thrilled they were getting rid of it.
 But the wife (who totally reminded me of myself) said that they no longer had room for it and it was going!
So funny, because this is me...no sentiment at all and Brian would seriously keep everything he ever owned if it was completely up to him!
The thing is though, that it made us love this table even more. Its not just some Craigslist find. It has a story and one that will continue with us.
I've already apologized for the abuse it has endured, the short time its been in my possession. 
I'm sure some of you prefer the navy and I did like it for a little while 
but my true love is with neutrals. Too much color and I get anxious! I'm feeling a nice little transition happening around here. Maybe bringing back more white and grey and a lot less of the blues. I mean who doesn't want to get rid of the blues? 
Okay, that was corny.

Senin, 25 Agustus 2014

Master Bedroom Update

Last friday I showed you all my new nightstand and if you couldn't tell I'm super in love with it! 
I really had this urge to update our bedroom because I wasn't loving anything about it. I needed it to be more neutral. There was too much going on and nothing was working for me. 
The first thing I did was get rid of every accessory in the room. I needed it to be bare bones to start with. I stripped the bed down to the white duvet and took down all the pictures, wiped the nightstands and dresser clean so I could start fresh. The first thing I noticed was that I hated the black and white nightstands we were using. I did spend some time looking for new ones but couldn't find anything I liked that wasn't going to cost me some serious cash. I even searched Craigslist for something I could makeover and nothing! So it was my two misfit nightstands or nothing.  After a week of making them over, Im so happy with how they both turned out! 
{before}
{after}
I moved the bed to the other side of the room. I felt like the nightstands in front of the windows was just too congested. There was so much going on there but the rest of the space was neglected! 
This also made the room feel so much bigger.
Before the window panels were just to heavy in my opinion so instead of using two panels on each window, I cut one panel in half, hemmed the edge and added one sheer panel in the middle. This got rid of the bulkiness and also added extra privacy during the day when the curtains are open. 
Here is the second night stand that we made over. It used to be painted black. This is what it looked liked after stripping the paint and sanding it. The color was beautiful! We have the match to this in Averys room (currently its painted white) and Im thinking that we are going to need to makeover that one the same way!
The next step was bedding. I just kept thinking to myself, keep it neutral!! 
I shopped the house a little and this is what I came up with. I made new white linen covers for the three Euro shams with material I already had.  In front of those, I added three linen pillows (they actually came with our sofa) and then my napkin pillows.  If you're like me and don't like using the matching pillows that usually come with a sofa, this is a good alternative. I don't like them on the sofa but I love them here! 
Brian and I each have our own chair, which I pretend is for reading but we both know its for throwing our clothes on! 
The room feels so much more peaceful to me which is exactly how your bedroom should feel. I'm super happy that we were able to make this room over for little to no money at all. Just a few supplies for making over the nightstands. Everything else I already had. I would like to add in a rug at some point but we also have plans to change out the carpet to hardwood and so I may just wait. 
I also have big plans for a light fixture for over the bed. I have had my eye on this one for awhile now but Im waiting because I want to find something similar for a little less...go figure! 


Jumat, 22 Agustus 2014

The dresser project

It's been a busy week around this place! 
Lot's and lot's of project's going on.
But one that is finally finished is our dresser/night stand makeover and I am so pleased with how it turned out!
Like super pleased and that doesn't always happen with my projects so Im extra excited to show you this one.
Let me start from the beginning and that is where I say that I have been hating my bedroom....like a lot. It wasn't how I wanted it and because I've promised myself I will be a mindful spender these days, going out and dropping a ton of cash on new nightstands, dresser, etc. wasn't in the cards...BOO to that! So I had to get creative and use what we already had. I knew I was done with the painted furniture look in here. Im all about stained wood that resembles anything Restoration Hardware. The trick was to get that look and really not spend very much at all.
This dresser was the first project to tackle....change this from a poorly painted white to something beautiful...easy, peasy!
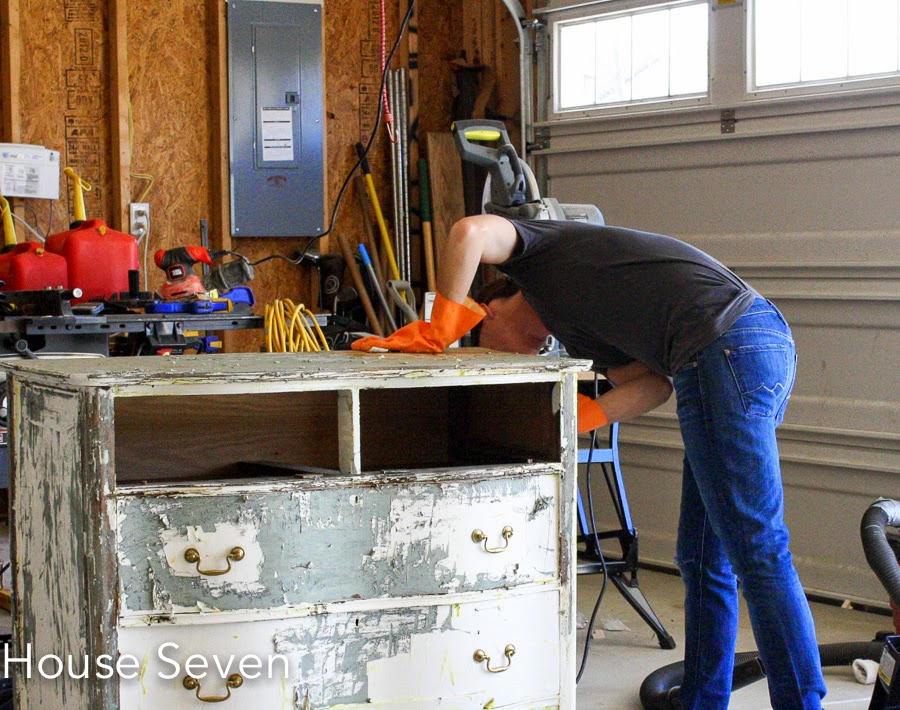
Okay, so if you have ever tried to sand three layers of paint off of a piece of furniture you will soon realize that paint thinner and you should meet! Lowes makes a nice one called Tuff-Strip and we have become best buds this past week. Seriously, I started off sanding this dresser and after ten minutes of pretty much no progress the impatient part of me kicked in and I was on my way to Lowes.
This is what Tuff-Strip will do in about 10 minutes.....aaammaazzing!
 
I'm not going to lie, it can be a little messy but so worth it if you want to work fast.
Don't forget your gloves because if it does this to paint just imagine what it will do to your skin! Ouch!!
After all the paint was off, I started to sand it all down. Now let me tell you, this is not some expensive antique I was dealing with. Actually, it was $8 from an auction so when this happened during sanding I wasn't surprised.
Thats the bottom of the drawer laying there...damn! Some wood glue later and it was back to good. You've got to just roll with it when you pay nothing for something.
The next step was to stain. Okay, so back to being frugal...I did a little research and found out that I could just make my own stain. Yes, and not only that but make it grey! Perfect, or so I thought.
First, you start off with a vinegar and water solution and then you add a wool steal pad to it. Let it sit over night and in the morning Voila, grey stain!
{Here is before}
{24 hours later}
The next step in the process was to brush the piece with some brewed tea from any 'ol tea bags.
Easy enough and the color was looking pretty good
Okay, so then you let it all dry and then brush on the stain
It was right around this time that the stain started to dry and I started to hyperventilate!! 
Oh my God, what did I just do?!? 
Apparently, the wood was already pretty dark so instead of the stain turning the wood a washed grey color it turned BLACK! The pictures still make my heart race a little. All that hard work and I had ruined it!!! 
Brian to the rescue!
He went ahead and covered the rest of the dresser with the stain to make sure it would have the same color thru out and then sanded the entire thing down again. Then he used minwax paste to seal it. I don't have any pictures of this part because I was curled up in a ball in a corner weeping! 
After I realized he had saved the day, I was ready to push forward. I needed hardware. I found some Martha Stewart bin pulls and knobs at Home Depot and sprayed them all gold.

After all that, here is our beautiful new dresser/nightstand. I think she's the prettiest!
 
I love how all the variations in color come thru, this can only happen if you paint it three different colors and stain it twice, I'm kidding but it's kind of true. And the wax makes it shine and the surface super smooth. If you have never used furniture wax on a project, I highly recommend you try it! 
 

We were so happy with how this turned out that we refinished the other night stand too. I will be posting on Monday all about that and how our room got a complete makeover in the process! 
Until then, have a great weekend!


Senin, 18 Agustus 2014

For The Love Of Letters Shop

When I come across something I love I just have to share it and right now I am in love with this little shop called 
Let me tell you how I found them...
One night while on Instagram, I was scrolling thru the recommended accounts that Insta is nice enough to share with me because I guess we're friends now and they kinda know what I like....well, what do you know....they do know what I like because they introduced me to this cute little shop called For The Love Of Letters! 
So I started following them and I was immediately smitten with the best handwritten font artwork I had ever seen....I mean seriously, so dang cute! 
Then one day I saw that they were having a little pop up shop at Madewell! Hurray!!
So happy I went because not only was I able to get my hands on some For The Love of my own but I also had the privilege of meeting the owner and artist behind it all, Erin! What a doll she is! I mean seriously maybe the sweetest gal ever! She's not only talented but you kinda want her to be your new best friend after meeting her because she is so stinking nice! 
Here's a little bit about her in her own words (which will only make you love her more) 
i'm a midwest gal with southern roots. graduated college in texas with a degree in communications & snagged myself a minnesoooota gentleman shortly after. dutch keeps my fire lit even though his career is putting them out. momma to liv & finn. lover of lip gloss, sharpie pens & glitter. i've loved to "letter" since i was old enough to hold crayolas. i always stick my tongue out when i write & still to this day, you can tell i've been busy when my lips are chapped. go figure. my style of lettering is full of personality, a little whimsy & a lot of fun. i like to refer to it as "perfectly imperfect." motherhood has changed my "career path" & i feel so so blessed to do what i LOVE to do while balancing being a firefighter wife with 2 littles. i hope these designs make your heart as happy as they have made mine.
Here are some of the For Love work's of art I have around my home....
This Work Hard and Be Nice to People wood sign is my all time favorite! 
What a great motto to live by! 
It's traveled thru the house a bit so far and I love it everywhere it ends up! 
Right now its camped out on our entry way table. 
 

 What about this little cutie in Avery's room.
Kindness is always fashionable....something I definitely want my girls to know!


She even has adorable prints with my favorite Avett Brothers lyric's....sigh!


Great prints and framed art aren't the only goodness in her shop and for all of you Indiana folks out there, check out this super cute Local tote! 
Perfect for your Indiana corn or anything else you wanna throw in it!
Not only are all the items I picked up super cute but now is the perfect time for you to get some 
For the Love of Letters of your very own!!! 
 For The Love Shop is nice enough to offer all House Seven followers a 20% off coupon code!! 
Just use promo HOUSELOVE20 from now thru the 25th to receive 20% off your order and don't be surprised when you can't choose just one! 


Senin, 11 Agustus 2014

Thrifty finds

This past friday was my first full day of freedom since my girls went back to school. Yes, I said freedom. I'm not going to lie, I love my girls but I did a happy dance when the school bus scooped them up and whisked them away for the day. This mama needed a break. 
I could of spent the day doing some much need cleaning or organizing of drawers and closets but what fun is that? Instead, me and the littlest one did a little thrifting and it paid off. Three thrift stores, $65 later and here is what we found. 
This basket for $3. I have this weird love for wicker baskets? I don't know why but every time I see one, I have to buy it. This one is a giant and I'm sure it will do a lot of traveling around the house, holding this and that for a long time to come. 
Notice the little polka dots of light reflecting on the wall...Yes, I finally found a disco ball!
Disco Ball $2. Its a little one but I love it and now I'm on the hunt for a larger one. I've been seeing them all over blog homes for quite some time now and although I resisted the trend at first, I'm completely on board now! As soon as I saw those little dots of light reflecting all over in the room I was hooked! 
School chairs $60. Our work room has been in desperate need of chairs! The kid's have been standing at the table to work the last couple of months ever since I stole the chairs out of here for the navy table in the kitchen. Oops! So when I saw these at $15 a piece, I had to grab them. 
I'm not set on the color but I also don't feel like painting them right now and it isn't bad so for the meantime, yellow it is! 
I love thrifting when you actually find something good, who doesn't, right!?!
 Honestly, I can get a little turned off from it every now and again when it seems like most of the stuff I find is crap and over priced! Heres a little secret about me, I hate overpriced crap. I'm sure you can relate.
 I know I probably won't have as good of luck the next time I get to go out but I guess when you are looking for something for nothing that goes with the territory. 
Happy thrifting!

Kamis, 07 Agustus 2014

Project Barn Door

I'm so excited I finally get to show you guys this! The barn door is up and I love her!! I'm not going to lie, this project felt kind of challenging at first but it couldn't have worked out better. Brian outdid himself on this one! 
We made the door and all the hardware ourselves (okay, Brian did) and it was way more cost effective that way. Thankfully we live extremely close to Home Depot, Lowes and the Tractor Supply store because it was a few trips back and forth as we figured it all out. It weighs a ton so we wanted to be extremely careful on how we would mount it on to the wall. Brian had nightmares of it falling and taking the entire wall down with it!  Thankfully that didn't happen. When we were searching for tutorials on interior barn doors we couldn't find any that showed the back of the door and we had to make sure both sides looked finished since you would be able to see both when the door was closed. I'm planning a full tutorial with material lists and instructions on how we did all this because I feel like we kind of struggled finding a tutorial already out there that would work for us. Now don't get me wrong, I'm super appreciative for all the information we were able to find and it did give us a good idea on how we wanted to tackle this project.  Exactly how we did just that, I will be sharing soon. But for now, lets just take in all her beauty!
 

I love that I can finally shut off the kitchen to the front room and the double ovens no longer greet everyone who walks through our front door. 
I can't believe it took me so long to figure out we could do this in here because now that it's up I can't imagine the room with out it. It's such a giant statement piece and I love how you see it as soon as you walk in to the house! 
I am so happy with this room now, it might even be my most favorite one in the house...for a little while anyway! 

Senin, 04 Agustus 2014

Obsessed with Ranarp Lights

Have you seen these yet?
Its the Ranarp lighting series from Ikea and I'm a smitten kitten!
I have all but one, the floor lamp. But I have a feeling it might be coming home with me on the next trip there. I just love the sleek design, um their white and the cost can not be beat! Even the cord is cool with its black and white chevron design.
I first purchased the large pendents for my kitchen. I can't even begin to tell you the level of my excitement when I saw these babies for the first time!! Like off the charts! I get a little worked up for these kind of things, if you can't already tell. I had been looking for a year for the right pendents and had my heart set on some from Crate and Barrel. The only problem was, when I went to purchase them the company had discontinued them!!! UGH!!
Who are you people that do this to me?!?  
When I was able to finally pull myself out of my pendent light funk, I began my search again, 
and what do you know, I stumbled upon this post above and I couldn't believe how perfect they were! Thank you lighting gods whoever you are, you saved me $520 in the end! 
After falling in love with these two above, I couldn't stop thinking about the others!
This was around the time I re did Avery's room and I thought the work lamp would be perfect on her night stand so...... I looked up how far away Ikea was from Brian while he was traveling to Houston and what do ya know...they have an Ikea there!  I can tell you he wasn't super happy about bringing it home on the plane but he did and I am forever grateful.
The thing was that I loved it so much, I kind of stole it.
I mean, I just really liked it here, so it never left.
It's just so pretty!
But that meant that Avery was still in need of a lamp or lamps if you will.
So.....
I know, Im obsessed, but seriously they are so cute!


Kitchen 24 Menu Copyright © 2012 Fast Loading -- Powered by Blogger