Warung Bebas

Jumat, 26 Juni 2015

Lunch date and Uashmama

For the past year Friday has been my day off. I use the term "day off" lightly because well, Im a mama and mama's don't get days off! Which is fine by me because I love these little nuggets of mine and I realized a long time ago that I love being with them more then anything else.
So every friday the four of us head out on an adventure of sorts. We go exploring. Which really means that I make them tag along with me while I try out new lunch spots. 
This past week we lunched at a trendy new pizza place downtown....I'm doing my best at hipster mom these days! We also came to the conclusion that visiting these places during their slowest times of the day keeps this Mama from completely losing her mind.
Bringing three girls along with me everywhere I go has resulted in carrying a lot of stuff around. Like it or not! Not to mention, I am not a diaper bag mom so I always need something a little oversized but still cool that will fit the multiple devices, diapers, wipes, shoes (cause who keeps those on?) and then maybe just maybe there is some room left in there for my things. 
So I was pretty excited when I found my new Giulia Bag by Uashmama. 
Its paper! Seriously, its made from washable yet super durable paper that feels like leather. Even the Mr. was impressed and he doesn't get in to this sort of thing!  If you haven't heard of them yet, its a family run company 'Le Sorelle', which is made up of four sisters so of course this was near and dear to my heart.  Oh and check out the cutest little key holder...you know for when, if ever, I'm just out by myself and don't need all this extra storage.
But for now this is my life and this bag has been the perfect solution. Its not super heavy and it fits all my (their) stuff without me having to dig for it. 
We really had too much fun checking out this new pizzeria and basically had the entire place to ourselves so that was pretty awesome! Check out this graffiti wall. My middle one was all about it and asking if we could do that in her room? Maybe!! Personally I was dying over the cool lighting and of course all the white! White, Black, Wood...how could I not love this place?
When we had sufficiently made the entire restaurant staff crazy with our antics and picture taking it was off to explore the rest of downtown. I'm a city girl at heart and I would so live down here if I could just get the Mr. on board.
The girls love all the shops and I love the architecture. This red door and navy entry..I wouldn't mind calling this home. 
It turned out to be one of our best exploring days yet and I'm looking forward to seeing what today brings because its Friday y'all!! Oh and you can believe that this Uashmama bag is coming along. When I find something that works and is this cute and modern on top of it...I'm hooked! 
Okay sorry but just one more of this door!!

Rabu, 24 Juni 2015

Source List - Dining Room

I've been meaning to get this source list of my home together for awhile now and the best way I can manage to get it done is like everything else in my life....one room at a time.
I have spent many months up to now creating spaces in my home that feel cozy and warm but with far less things to clutter and ultimately create more work for me.
So many things have been taken away and with each piece that goes I can breath a little better, my mood is lightened and my family is reaping the benefits ten fold.
The realization that less is best didn't happen overnight. In fact it has taken months of perusing through pictures on IG and Pinterest for me to realize that the pictures that wowed me were the ones with minimal items in the space. Light and white was my thing.
Now I can be a bit extreme with my plans sometimes and because I could see myself dumping my entire house upside down and getting rid of it all I had to restrain myself and find the balance. Now I approach my home design by concentrating on each item in the room and if I feel like it's adding something positive to the space or if it is taking away? Basically, I'm asking myself these three question's a lot...
-Do I love it?
-Does it make me happy?
-Would I buy it specifically for this space?

If I'm answering no then it goes away and I mean like the Goodwill away or the trash. I don't hold on to things for the "just in case". Because that creates more work by having to store it or in our case having to move it somewhere else. Which costs money. I don't want my things to own me.
The truth is that I have never regretted getting rid of anything. Not one thing! Out of sight, out of mind!
Well all this explanation is leading me to my source list for the house. Seriously.
The Front Room
Our front room has been set up a million different ways and for awhile now it has been a dining room. The longer we have lived here the more I have taken away from this room and the more it makes me feel at ease. I mean look how little there is to clean in here. I even brought the rug to the basement storage just for now. I will use it again in this room but for summer months, I wanted it to feel lighter. Not to mention the floor is so much easier to clean with out it in here and I love that!
Source's
Table//World Market {similar here}
Lighting//Table Lamps//HomeGoods {similar}
Large Prayer Beads//West Elm (in store display)
Large Glass Jar//Target
Small Glass Jar//HomeGoods
Fiddle Leaf Fig Tree//Allisonville Nursery
Large wicker basket//Goodwill
Mirror//HomeGoods {similar}
**Please refer to links in right sidebar for paint colors


Senin, 22 Juni 2015

Cataluv my new obsession

This past weekend was pretty much like the rest of our weekends lately....crazy busy! 
I had all these big plans of shopping for some new stuff for the house...some needed...some I just wanted. Well, basically it was a complete fail because by the time everyone was dressed, fed, diapers changed, hair combed and maybe if they actually remembered to brush their teeth with out me reminding them like 10 times we would be out of the house by noon! 
Then when we all finally do get out its just a series of "I have to pee" "I'm thirsty" "please buy these new toys" "She's looking at me"! I can't even concentrate on what I'm looking for or really why I'm even in this store in the first place. Like how many times have you looked at your kids just being completely nuts in a store and thought....Why did I even think this was a good idea?!?
So we all went home and I bought nothing! Good for the wallet, bad for my disposition! 
Well, thats why when the lovely creators of Cataluv invited me to check out their new app that is now available in the iTunes store I was intrigued. 
The best way for me to describe it would be that if Pinterest and Instagram had a baby, it would be Cataluv! Its seriously the greatest of both worlds because you get these amazing inspirational images but then you also have the option to purchase the items you see right then and there. Super easy and no kids screaming at you that they want out of the cart while you shop!

I'm so impressed with the images on the app and how user friendly it is. It's such a fun way to shop and how nice to be able to see all the products styled as you shop for them as opposed to them sitting on a store shelf or shopping each individual item on line. You can create an entire look with just a few taps and your done because you can purchase the items right in the app and you aren't redirected elsewhere, which I have found can be a pain! I also love that you can save your favorite inspirations from the app so you have them available when you are ready to purchase. Its really perfect for someone like me that can't necessarily always purchase everything I want right then and there. 
One of my favorite retailers Canvas Home is on the Cataluv app! Their home decor is so good and 
well, you know its always a good thing when I can tell you that Cataluv has partnered up with Canvas Home to give you all the chance to win one of their Dauville Pitchers and also a teacup and saucer set. 


Oh my I love these!! 
Pop over to my Instagram to enter...this giveaway is only for 2 days so you better do it now! 
Oh and make sure you download this free app today here! I've been on it everyday since it went live and I'm pretty much obsessed! 


Selasa, 16 Juni 2015

DIY PLANKED FLOORS

This post is finally coming to you and sorry for the major delay!! But here it is....
So the story goes something like this.
1. I hate the carpet in our upstairs
2. I wanted to replace it with wood floors
3. It wasn't in the budget
4. I am super impatient so I found a less expensive and in my opinion SUPER AWESOME alternative! 
PLYWOOD
Okay. so I'm not the first one to come up with this idea... theres like a zillion tutorials out there on how to do these floors with everyone tweaking the process to fit their own specific needs. I know this because one night while I was sitting in the bath (TMI but true) I was thinking about this dang carpet and how much I hate it with my entire being!! So... I googled Plywood Plank Floors and BAM just like that all this information was there at my fingertips. One of the first to pop up in my search was this one {here} Jenny from the Little Green Notebook {my all time favorite blogger to stalk} had done her office floors this way and because I have followed her blog for years and totally trust her because in this weird sort of way I think I know her, because I've been reading her blog for so long, and I think she is a genius, and secretly would like to be her friend....okay, I will stop with the over sharing....Aack!
Well basically, I was like if Jenny can do them, then so can I! So we did, or should I say my kind husband did......I helped....a little. 
First....up came the carpet....Ahhhhh glorious! 
No more yucky carpet and padding. Oh and I forgot to mention, I was also completely over the gray, so we painted it all white again! I used Sherwin Williams Extra White which is what is in the rest of our home. Please believe that you better think twice about painting your room charcoal grey if you are going to paint it white again in a year. Thats a lot of primer and your eyes will be popping out of your head after a few hours of staring at a white wall wondering if you can still see spots of gray!
But it was a total family affair and we knocked it out pretty quickly.
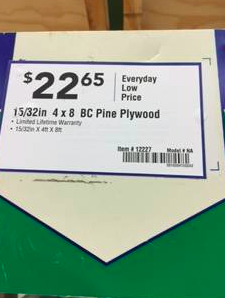
Here's the exact wood we used from Lowes
Brian had the kind gentleman at Lowes cut the sheets in to 8" planks. Each sheet provided 6- 8" planks. He came back the next day to pick up all the planks so that they had plenty of time to make the cuts. (they are over us there, I'm pretty sure of it!) 
 I will be very specific and tell you that he sanded these planks until they were as smooth as a babies bottom and he also beveled all the edges. He worked on sanding each plank one at a time. It took him roughly 4 hours to sand all the planks for our 14x14 room.   No one is getting a splinter from these...ever! 
We followed the LGN tutorial and applied the subfloor liquid nails to each plank and then nailed them down using a nail gun. It went pretty fast. We also had no rhyme or reason for the pattern of the planks. I wanted the spacing to vary as he went and also for the boards to be a bit of a mixture in length. I wanted it to look imperfect.
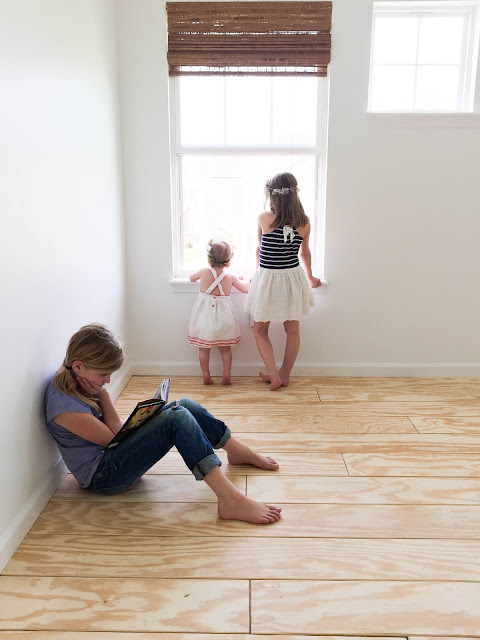
Fast forward to the completed floor install. Giant empty rooms are so fun when you're a kid. They played in here as much as they could before we had to start painting. 

The next step was to paint the floors.

I purchased this primer and made a mixture of 1 part primer // 3 parts water and white washed the floors using a paint roller with a broom handle. This was the easiest part. That was once I realized that the wash is super thin and splashes all over the place if you aren't careful. 
After the wash had dried over night our next step was to polyurethane the floors to protect them from the wear and tear. But this where our tutorial will differ from the LGN tutorial. So before we started to Poly, Brian noticed that there was a spot on one of the planks that seemed a little rough for his liking and insisted he sand it before the next step. I on the other hand didn't think it was that big of deal but since he had done almost all of the work up to now, I wasn't going to argue the point.
Well, after he sanded that one spot we realized how much we liked seeing some of the texture from the wood grain come through the wash even more then before and so he went ahead and sanded the rest of the room....we loved it!
When he finished, the floor had so much more character and you could really see the wood grain so much better. It really was a perfect accident. 
Now it was finally time to poly. 
This also took no time at all because we used the roller and long handle to apply it to the floor. 
Once we let it dry for a day we moved everything back in to the room. 
I love how these floors turned out! I will say that the polyurethane did leave a yellowish tint to the floors which I have also heard from others whom have tackled this DIY. Even with the clear formula that we used, we still had some yellowing. I'm personally okay with it. Especially when it was only around $200 for us to complete this project and change the look of our bedroom entirely! 
Our plan is to finish the entire upstairs in these floors. Its perfect for us because we can do it on our own timeline and don't have to worry that our floors will be discontinued before we finish! We are super happy with how this DIY turned out! We can't wait to get started on the next room....okay, I can't wait to get started. Brian, well thats another story all together:)


Senin, 15 Juni 2015

Pinterest Inspired EBTH = LOVE

 You know my intense love for all things neutral. Yet lately, I've been thinking about color. Not all colors....just blue. Its been on my mind since I picked up some Ikat fabric {here} a few months back while on an out of town trip with the Mr.
Well then I realized while scrolling through my Pinterest boards late the other night that I had pinned quite a few rooms with blueish green sofas...hmmmm.

 This image here below is something I've been holding on to for years...I've been smitten with this room since I laid eyes on it in the pages of Southern Living.
But what really got me was this image below...gah! It's so good! I wanted to recreate this space completely. But I wanted to be able to do it on a budget because if you have all the money to go out and just buy everything you see in a magazine or on Pinterest then interior styling is so much easier. Obviously!! But if you have to stick within a budget like the majority of us then you must be creative. You need to have excellent resources to pull from and thats where Everything But The House comes in! It wasn't that long ago I was raving about this one of a kind website on here!!
I pretty much knew I could find the majority of these items on the EBTH website and you are going to die when you see this beauty I found!!! Shut up! So good, RIGHT!!! 


I love this sofa!! {I would totally paint the legs black} I feel like I could do so much with this piece and it fit perfectly in with my plan of recreating this room. Sometime's you just get lucky..this was that day! 
Everything in this design board below is straight from the EBTH website! Some of these items are  currently listed and others are from ended auctions. 
 Every last thing! Which to me is so crazy that not only do they offer all these amazing pieces but at auction prices where the cost is so much lower than retail! 
It just goes to show that you if you visit their website regularly you can build a complete room just from shopping EBTH!


Adding in bamboo shades, fun curtain panels and some pillows would pull the entire room together and complete the space!  Every space needs some living elements so don't forget to add in your plants like the current "it" plant, the fiddle leaf fig or my all time favorite... succulents.
I always look for my main pieces first. The largest items that you will place in a room. They will set the tone for the entire room and what better way to stay in budget then to purchase them on the cheap but still maintain great quality. 
Whomever walks away with this sofa is the luckiest and I would love to see how they style it in their own space because you can see how I would use it....oh I need more rooms!
You can find a link to all of these items {here}
{Sponsored but all opinions and designs are my own}

Selasa, 02 Juni 2015

Missing the Boat


This is one of those posts where Im most likely going to ramble a bit so feel free to check out at anytime. This is the post that Im writing because I felt the pull to write one and although my initial thought was to finally get the post up about our DIY planked floors, when I went to write it and then edit my photos I realized that my Lightroom membership had expired and now will take sometime in the next 24 hours to start up again! UGH. 
But I thought, Im going to write something anyway. Which leads me to this...staying focused on the goal while everything seems to be swirling around you. 
I have a major goal and one that I have prayed daily about....Oh, please God lead me down the path that is best for my family. Not the one that I think I want, but the one that will make me a better wife, mother, friend. 
I've been working a regular full time job from my home for the past four years and although it can be rewarding it is not where my passion lies. I want to be creative. I want to be around creatives. I want to create and be imaginative and use this gift that God gave me to create something better. I want to make everything around me beautiful and functional and comfortable. Not just in my own home but for others too. I will do this, I am doing this. But this is the thing. I am still working my full time job which has been a real challenge in balancing it all. 
 My husband is my greatest support and he has pushed me and convinced me to give up the full time gig during the day and go full force with my styling services. It scares me a little but Im doing it. 
Life is too short. Something that has been a constant reminder for me as of late. 
So, I'm now in the final stretch of my last days with my full time job while still being a mommy and a wife with everything that comes with it. I am also staying up late working on this little design business, trying to find time to blog with something worthy of you reading it. 
It can be exhausting but so liberating and exciting at the same time. I can't remember the last time I felt this happy. 
But there are those days when I feel like I'm missing the boat. Like I waited too long and it left me on the dock. I unknowingly allow myself fall into the swirling abyss of my own mind where I think I'm too late. But then I have to remind myself that this is my one life and I have to make it wonderful!
So as I write this little motivational message to myself to stay focused, stay positive, don't allow my own mind to make me feel like the possible is impossible, I hope it will give you a little push to do what God is calling you to do.
What it is that makes your soul sing out loud! That one thing that you have hesitated to do because your mind has tried to convince you that you missed the boat! Oh friend, there are so many more boats!! 
Hang in there, I'm not alone, you are not alone. We so easily get discouraged by the perceptions of what others are doing and how they are holding it together so perfectly. We so quickly convince ourselves of these things just by looking at one glossy image that was strategically placed on our Instagram feed. Oh you know what I'm talking about. 
I needed this pep talk, I hope it helped you too. 
Have a wonderful day my friend and stay focused...you are amazing, you will be amazing at whatever you chose to do. You haven't missed the boat.  
 

Kitchen 24 Menu Copyright © 2012 Fast Loading -- Powered by Blogger