
This post is finally coming to you and sorry for the major delay!! But here it is....
So the story goes something like this.
1. I hate the carpet in our upstairs
2. I wanted to replace it with wood floors
3. It wasn't in the budget
4. I am super impatient so I found a less expensive and in my opinion SUPER AWESOME alternative!
PLYWOOD
Okay. so I'm not the first one to come up with this idea... theres like a zillion tutorials out there on how to do these floors with everyone tweaking the process to fit their own specific needs. I know this because one night while I was sitting in the bath (TMI but true) I was thinking about this dang carpet and how much I hate it with my entire being!! So... I googled Plywood Plank Floors and BAM just like that all this information was there at my fingertips. One of the first to pop up in my search was this one {here} Jenny from the Little Green Notebook {my all time favorite blogger to stalk} had done her office floors this way and because I have followed her blog for years and totally trust her because in this weird sort of way I think I know her, because I've been reading her blog for so long, and I think she is a genius, and secretly would like to be her friend....okay, I will stop with the over sharing....Aack!
Well basically, I was like if Jenny can do them, then so can I! So we did, or should I say my kind husband did......I helped....a little.
First....up came the carpet....Ahhhhh glorious!

No more yucky carpet and padding. Oh and I forgot to mention, I was also completely over the gray, so we painted it all white again! I used Sherwin Williams Extra White which is what is in the rest of our home. Please believe that you better think twice about painting your room charcoal grey if you are going to paint it white again in a year. Thats a lot of primer and your eyes will be popping out of your head after a few hours of staring at a white wall wondering if you can still see spots of gray!
But it was a total family affair and we knocked it out pretty quickly.

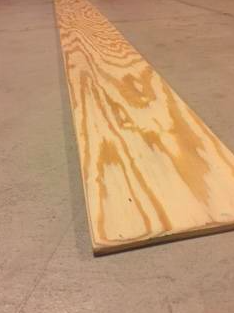
Here's the exact wood we used from Lowes

Brian had the kind gentleman at Lowes cut the sheets in to 8" planks. Each sheet provided 6- 8" planks. He came back the next day to pick up all the planks so that they had plenty of time to make the cuts. (they are over us there, I'm pretty sure of it!)
I will be very specific and tell you that he sanded these planks until they were as smooth as a babies bottom and he also beveled all the edges. He worked on sanding each plank one at a time. It took him roughly 4 hours to sand all the planks for our 14x14 room. No one is getting a splinter from these...ever!
We followed the LGN tutorial and applied the subfloor liquid nails to each plank and then nailed them down using a nail gun. It went pretty fast. We also had no rhyme or reason for the pattern of the planks. I wanted the spacing to vary as he went and also for the boards to be a bit of a mixture in length. I wanted it to look imperfect.

Fast forward to the completed floor install. Giant empty rooms are so fun when you're a kid. They played in here as much as they could before we had to start painting.


The next step was to paint the floors.

I purchased this primer and made a mixture of 1 part primer // 3 parts water and white washed the floors using a paint roller with a broom handle. This was the easiest part. That was once I realized that the wash is super thin and splashes all over the place if you aren't careful.

After the wash had dried over night our next step was to polyurethane the floors to protect them from the wear and tear. But this where our tutorial will differ from the LGN tutorial. So before we started to Poly, Brian noticed that there was a spot on one of the planks that seemed a little rough for his liking and insisted he sand it before the next step. I on the other hand didn't think it was that big of deal but since he had done almost all of the work up to now, I wasn't going to argue the point.

Well, after he sanded that one spot we realized how much we liked seeing some of the texture from the wood grain come through the wash even more then before and so he went ahead and sanded the rest of the room....we loved it!
When he finished, the floor had so much more character and you could really see the wood grain so much better. It really was a perfect accident.
Now it was finally time to poly.

This also took no time at all because we used the roller and long handle to apply it to the floor.
Once we let it dry for a day we moved everything back in to the room.

I love how these floors turned out! I will say that the polyurethane did leave a yellowish tint to the floors which I have also heard from others whom have tackled this DIY. Even with the clear formula that we used, we still had some yellowing. I'm personally okay with it. Especially when it was only around $200 for us to complete this project and change the look of our bedroom entirely!

Our plan is to finish the entire upstairs in these floors. Its perfect for us because we can do it on our own timeline and don't have to worry that our floors will be discontinued before we finish! We are super happy with how this DIY turned out! We can't wait to get started on the next room....okay, I can't wait to get started. Brian, well thats another story all together:)


